Overview
One of the key tasks in software development is testing. There are different levels of tests that we can apply in our projects.
In this tutorial, we are going to explore how Testcontainers works and how it can help us to write better integration tests. We’ll show how to use it in an application that uses PostgreSQL.
Test Levels
According to the test levels pyramid of Mike Cohn; there are 3 main levels:
- Unit Test
- Integration Test
- UI Test
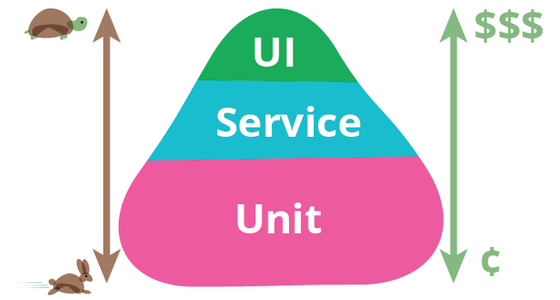
Figure 1. Test Pyramid.
Source: https://martinfowler.com/bliki/TestPyramid.html
Although unit tests are the pyramid base and a very important part, in some scenarios integration tests are very helpful to verify behavior especially with communication with external components outside the business logic.
Testcontainers
Testcontainers is a java library that we can use to run different testing frameworks (as JUnit or Spock) with docker containers. Docker as a developer tool, allows us to create easily environments with all its dependencies; they are light and runs quickly and, also are portable.
Requirements
To use Testcontainers we need at first having Docker installed in our system; and to use it with JUnit 5 then we need to add the junit-jupiter dependency to our Maven project:
<dependency>
  <groupId>org.testcontainers</groupId>
  <artifactId>junit-jupiter</artifactId>
  <version>1.14.3</version>
  <scope>test</scope>
</dependency>
To integrate with PostgreSQL we also need to add the postgres module:
<dependency>
  <groupId>org.testcontainers</groupId>
  <artifactId>postgresql</artifactId>
  <version>1.14.3</version>
  <scope>test</scope>
</dependency>
To connect to the database we add PostgreSQL driver and the Hikari pool dependencies:
<dependency>
  <groupId>org.postgresql</groupId>
  <artifactId>postgresql</artifactId>
  <version>42.2.18</version>
</dependency>
<dependency>
  <groupId>com.zaxxer</groupId>
  <artifactId>HikariCP</artifactId>
  <version>3.4.5</version>
</dependency>
And for the test we are going to use JUnit 5 and AssertJ:
<dependency>
  <groupId>org.junit.jupiter</groupId>
  <artifactId>junit-jupiter</artifactId>
  <version>5.7.0</version>
  <scope>test</scope>
</dependency>
<dependency>
  <groupId>org.assertj</groupId>
  <artifactId>assertj-core</artifactId>
  <version>3.17.2</version>
  <scope>test</scope>
</dependency>
Example
We’ll create an app to search products, let’s start with the database. First, we need to create a table where we’ll store our data:
CREATE TABLE application (
  id serial NOT NULL PRIMARY KEY,
  name text NOT NULL,
  details json NOT NULL
);
Now let’s insert some data:
insert into application (id, name, details) values (1, 'Transcof', '{
  "image": "http://dummyimage.com/213x213.jpg/ff4444/ffffff",
  "version": "0.54"
}');
insert into application (id, name, details) values (2, 'Stringtough', '{
  "image": "http://dummyimage.com/155x246.png/ff4444/ffffff"
}');
insert into application (id, name, details) values (3, 'Zathin', '{
  "image": "http://dummyimage.com/196x242.jpg/ff4444/ffffff",
  "version": "5.06"
}');
insert into application (id, name, details) values (4, 'Flexidy', '{
  "version": "8.7.3"
}');
insert into application (id, name, details) values (5, 'Bigtax', '{
  "image": "http://dummyimage.com/201x163.bmp/5fa2dd/ffffff",
  "version": "0.3.9"
}');
With our database ready, let’s create an AppRepository interface to model the product search:
interface AppRepository {

  long countProductsWithVersion();

  String findNameById(int id);

  //helper methods to handle JDBC Statements and ResultSets ...
}
Then, let’s implement this interface in the DefaultAppRepository class:
class DefaultAppRepository implements AppRepository {

  private final DataSource dataSource;

  public DefaultAppRepository(DataSource dataSource) {
    this.dataSource = dataSource;
  }

  @Override
  public long countProductsWithVersion() {
    try (var result = performQuery(dataSource,
        """
            select count(id) as count from application
            where details -> 'version' is not null
            """)) {
      return result.getLong("count");
    } catch (SQLException e) {
      return 0;
    }
  }

  @Override
  public String findNameById(int id) {
    try (var result = performQuery(dataSource,
        "select name from application where id=?", id)) {
      return result.getString("name");
    } catch (SQLException e) {
      return "";
    }
  }
}
With our code ready, let’s use Testcontainers to write some integration tests.
Some of the annotations we’ll be using in our tests:
-
@Testcontainers: This annotation handles automatically the container’s lifecycle. It is in charge of start-up and closed-up every container in our tests. -
@Container: Marks containers to be managed by the Testcontainers extension. The Testcontainers API has a great variety of container alternatives as Databases (SQL and NoSQL options), Messaging, MockServer, AWS Localstack, and more. Also, if we need it we can create GenericContainer too.
Now lets see it in action, we’ll create DefaultRepositoryIntegrationTest class:
@Testcontainers
class DefaultRepositoryIntegrationTest {

  static final GenericContainer container = new PostgreSQLContainer(
      "postgres:9.6.12")
      .withDatabaseName("product_db")
      .withUsername("user")
      .withPassword("password")
      .withInitScript("init_script.sql")
      .withTmpFs(singletonMap("/var/lib/postgresql/data", "rw"));

  static DataSource datasource;

  @Test
  void givenId_whenFindNameById_thenGetName() {
    var repository = new DefaultAppRepository(datasource);

    String name = repository.findNameById(1);

    assertThat(name).isEqualTo("Transcof");
  }

  @Test
  void givenAppsWithVersion_whenCountProductsWithVersion_thenGetCounter() {
    var repository = new DefaultAppRepository(datasource);

    long count = repository.countProductsWithVersion();

    assertThat(count).isEqualTo(4);
  }

  @BeforeAll
  static void init() {
    var config = new HikariConfig();
    var jdbcContainer = (JdbcDatabaseContainer<?>) container;
    config.setJdbcUrl(jdbcContainer.getJdbcUrl());
    config.setUsername(jdbcContainer.getUsername());
    config.setPassword(jdbcContainer.getPassword());
    config.setDriverClassName(jdbcContainer.getDriverClassName());
    datasource = new HikariDataSource(config);
  }
}
As we saw, we create a PostgreSQLContainer using the image tag postgres:9.6.12, and we used the API to set up the common options.
A powerful option is the withTmpFs that allows us to map the container volume to our host memory.
If we want to speed up our integration tests we can declare containers as static fields to share between tests. In our case, our test run on an average bellow to 150ms.
Conclusion
In this tutorial, we saw an example of how to run integration tests with PostgreSQL using Testcontainers.
The complete code is available over on Github.